Converting a Lucas RB106 Voltage Regulator to an Alternator Dummy Box
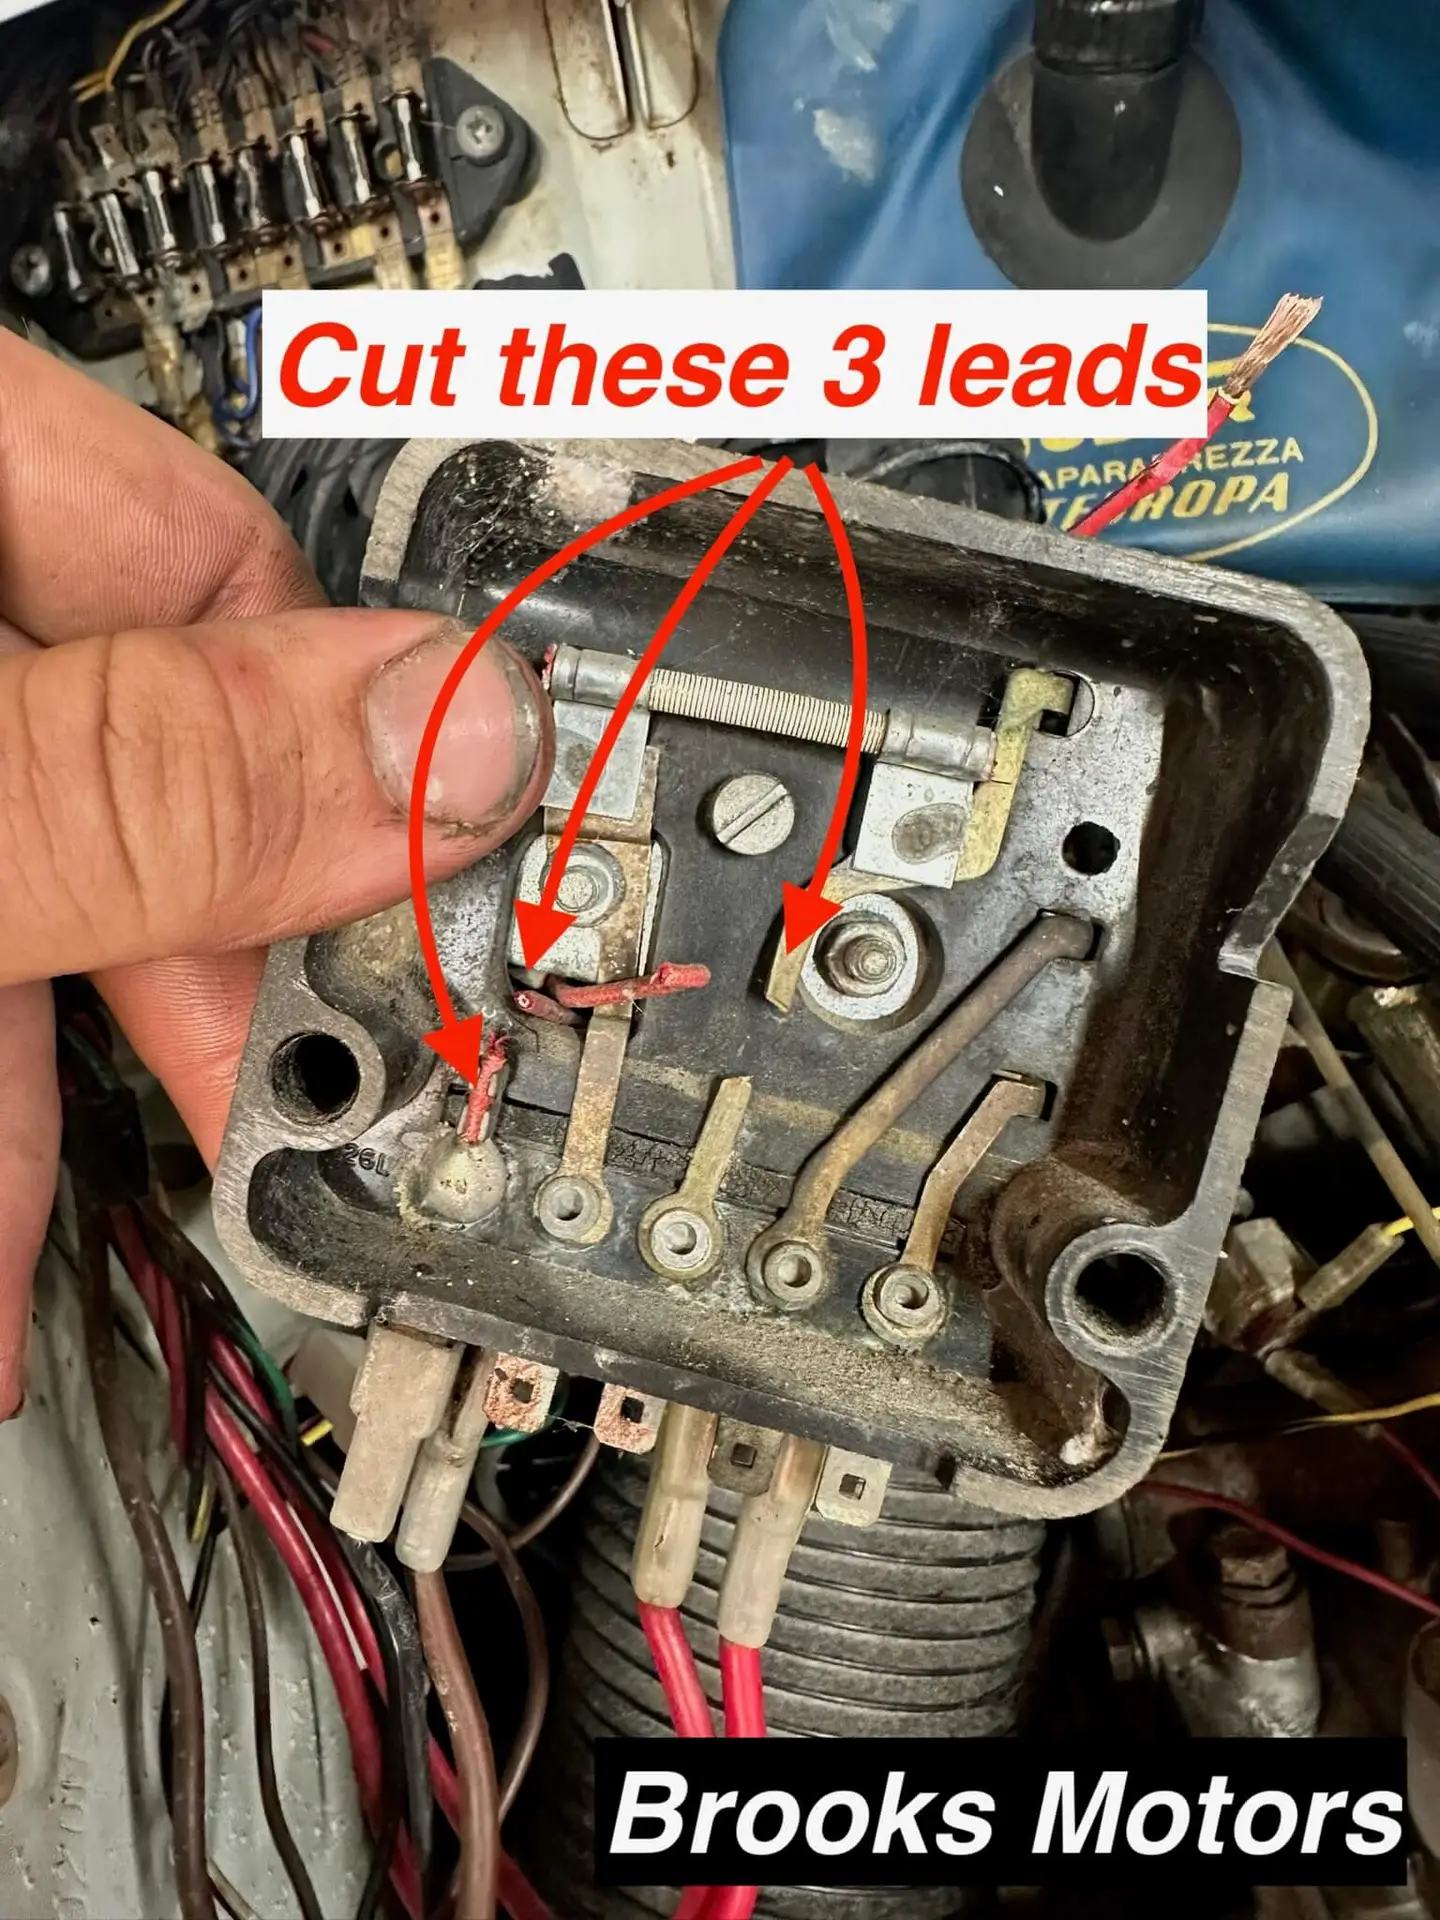
The Lucas RB106 control box is found in many old British cars. It controls the dynamo’s charging. When upgrading to an alternator, this box is no longer needed because the alternator controls its own voltage. However, instead of removing the box, you can turn it into a dummy to keep the original look and wiring.
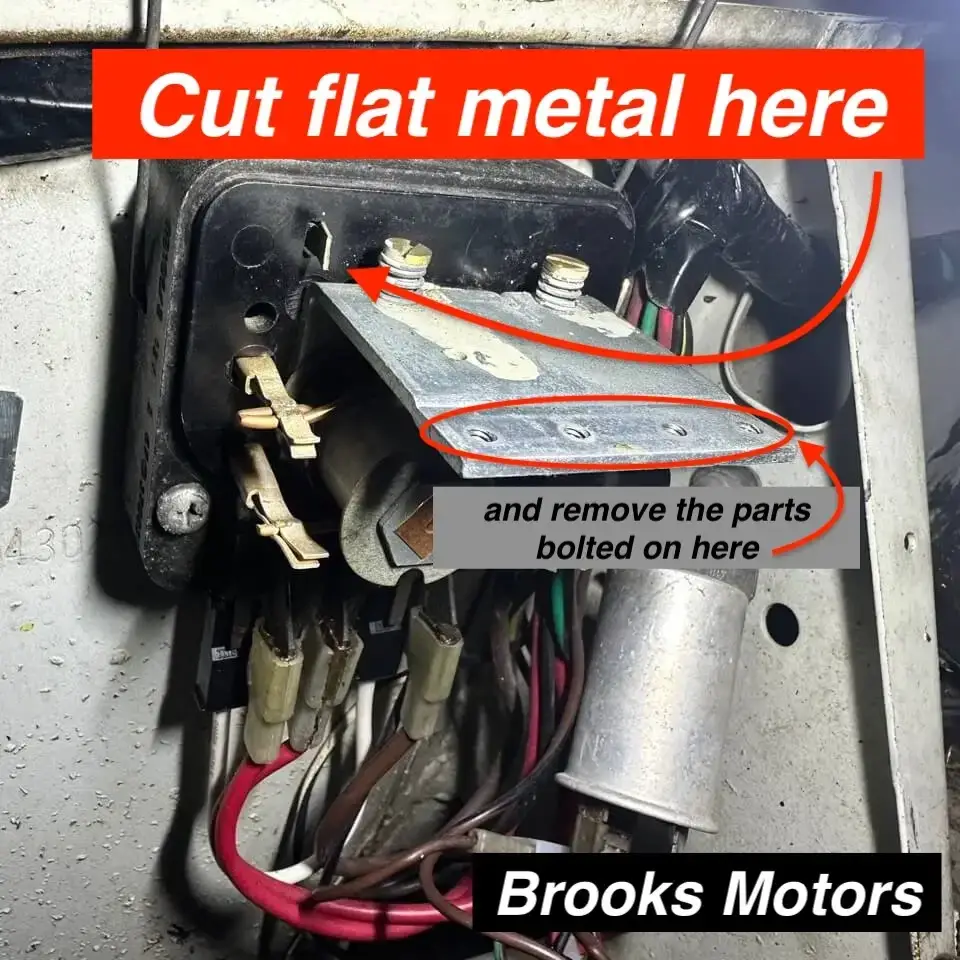
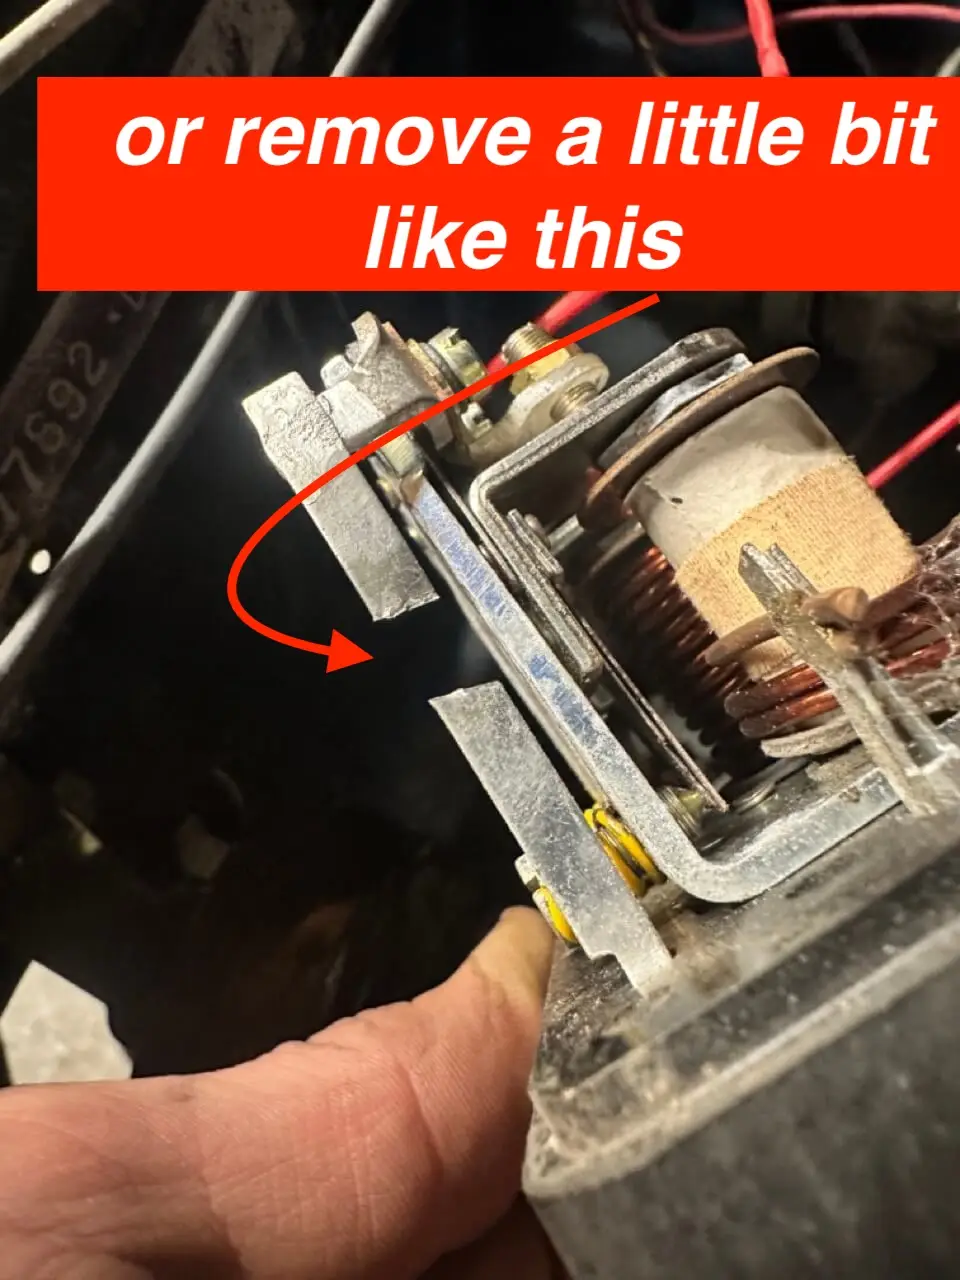
To make it a dummy, we’ll connect the A1 + A terminals directly to the D terminal. This bypasses all the internal parts of the box. You can add a fuse if you want, but it’s not necessary as your 80’s MINI isn’t using one either. If you use a fuse, make sure it’s a strong one (at least 50A). Once connected, the box will only act as a pass-through for the wires.
Additionally, the dynamo warning light on the dashboard and the black/white D+ wire on the alternator (thin wire) also need to be reconnected. This is done by connecting them directly.
Note: A1 and A are both positive (+) connections from the battery. For normal use, they are different, but as a dummy box they will act the same. (more about normal use read here: Chapter 5)
What we will do:
- Measure the current wiring.
- Remove the box parts and make it a dummy.
- Reconnect the dashboard warning light and alternator signal wire.
- Install the dummy box and test it.
Step 1: Measure the Current Wiring
- Open the Lucas RB106 box. Make sure the engine is off to avoid a shock.
- Take a photo of the wiring so you know where everything is connected.
- Check the wires connected to the box. Use a multimeter to make sure they are connected correctly:
- A1 and A should both measure positive (+) with the engine off. (mostly seen in 2*RED)
- F should be the measuring wire for the dynamo (mostly seen in BLACK/WHITE
- D should be connected to both the Dynamo incoming lead (mostly thick brown) and a tiny brown wire going to the dashboard warning light (the light that goes red when the ignition is on and should turn off while the engine is running).
– Check both with the Ohm-meter when disconnected from its tab.
– The D tab should measure positive when running (NOT when off). - E is the ground and therefore should measure around 0 Ohms to the engine. (almost always BLACK)
- Disconnect the battery to avoid any accidents.
Step 2: Turn the RB106 into a Dummy Box
- Once again; make sure the battery is disconnected!
- Remove the lid and undo the screws holding the box in place; you can leave the connections as you can do the following within the car;
- The images underneath speak for themselves but do make a cut in the following positions:
– Cut the F (middle one) in two places; both the back AND front! Make sure there is no connection anymore.
– Cut E (the ground) two red wires will connect to this pin and I need you to cut them both, make sure they won’t reconnect.
{See pictures underneath} - Let’s create the wire to connect either the A1 or the A terminal directyly to the D terminal; We’ll use a strong/ thick wire (equal thickness as the A and D wire itself 😉
– Get yourself the electrical wire and cut about 10cm off.
– put a isolated AMP connection on both sides of the wire (it’s going to be the positive so they need insulating
– Make sure the AMP connections are secure!- Optional: Add a fuse in (at least 50A) between the connections if you want extra safety, it’s not necessary.
- Put the just made wire between terminal (either A1 or A) and D. Sometimes the metal tabs on the control box needs a little polishing up, do this first.
Step 3: Reconnect the Dashboard Warning Light and Alternator Signal Wire
- Identify the black/white D+ wire from the alternator (the thin wire) and the small brown wire going to the dashboard warning light.
- Remove the black/white wire from the F terminal on the RB106.
- Remove the brown wire from the D terminal on the RB106.
- Connect these two wires directly using a short piece of wire with 2 female AMP connectors (as shown in the image below).
- Ensure all connections are firm and insulated properly to prevent short circuits.
Note: If we don’t do this, the ignition light will keep getting 12 volts, will stay on, and continue to drain the battery.
Step 4: Reassemble and Test
- Put the box back in the car. Check that all wires are free of the body and connected like they were before (plus the extra made cable between A1/A and D.
- Connect your new alternator as you planned before.
- Start the engine. Use a multimeter to check the alternator’s output. The voltage at the battery should be between 13.8V and 14.4V. (sometimes needs a little rev before she’ll start)
- Important! Check that the charge warning light works properly (on when the ignition is on, off when the engine is running).
- Final check if everything is okay and nothing is melting away 😬
- turn the engine off, put the lid back on and you’re done. you did a JOBBB!
Final Notes
- Write down the wiring changes for your reference or for the next owner.
By converting your Lucas RB106 control box into a dummy box, you can use a modern alternator while keeping the classic look of your car. This simple change improves reliability without losing the vintage style.